
Explore the globe with the Pokémon GO community as your guide! Chart a course to show off your favourite sights, or follow in the footsteps of local Trainers to see what that community loves.
Routes are created by adventurous Trainers, just like yourself! Imagine what you’ll find as you travel another Trainer’s Route—an encounter with your favourite Pokémon? A new friend to share Raid Battles with? Follow a Route and find out!
Routes will help you meet Mateo and partake in his gift exchange, and collect Zygarde Cells!
What is a Route?
A Route is a pre-defined path that you can follow while exploring. These paths may be made by Niantic, official partners or other Trainers, like you!
As you follow a Route, you may discover Pokémon and Items, and completing Routes will grant you rewards. Completing a Route will earn you the badge associated with that Route, featuring a custom photo from the start or end point. Bronze badge is 5 Follows on a Route, Silver is 20, Gold is 100.
A Route can be anything, from a scenic walk across the nearby hillside, to your daily dog walking route. Niantic wants players to feel free to express themselves, and they told us that they do not want to suppress Trainer creativity. The only rule is that they must start, and end, in a gym or PokéStop.
The only thing they plan to suppress are potentially offensive or inappropriate Routes, such as Routes going through forbidden areas, or Routes shaped like inappropriate body parts or symbols.
But that’s about it – Routes are a truly free-form type of User Generated Content that Pokémon GO is getting. Routes don’t actually work as Ingress Missions, which was a long running belief in the Pokémon GO community, they are completely free-form, akin to recording a walk with Strava, or another fitness tracking app.
Bonuses
What’s an adventure without some treasure? There’s an assortment of bonuses to enjoy while exploring Routes!
Finding a Route
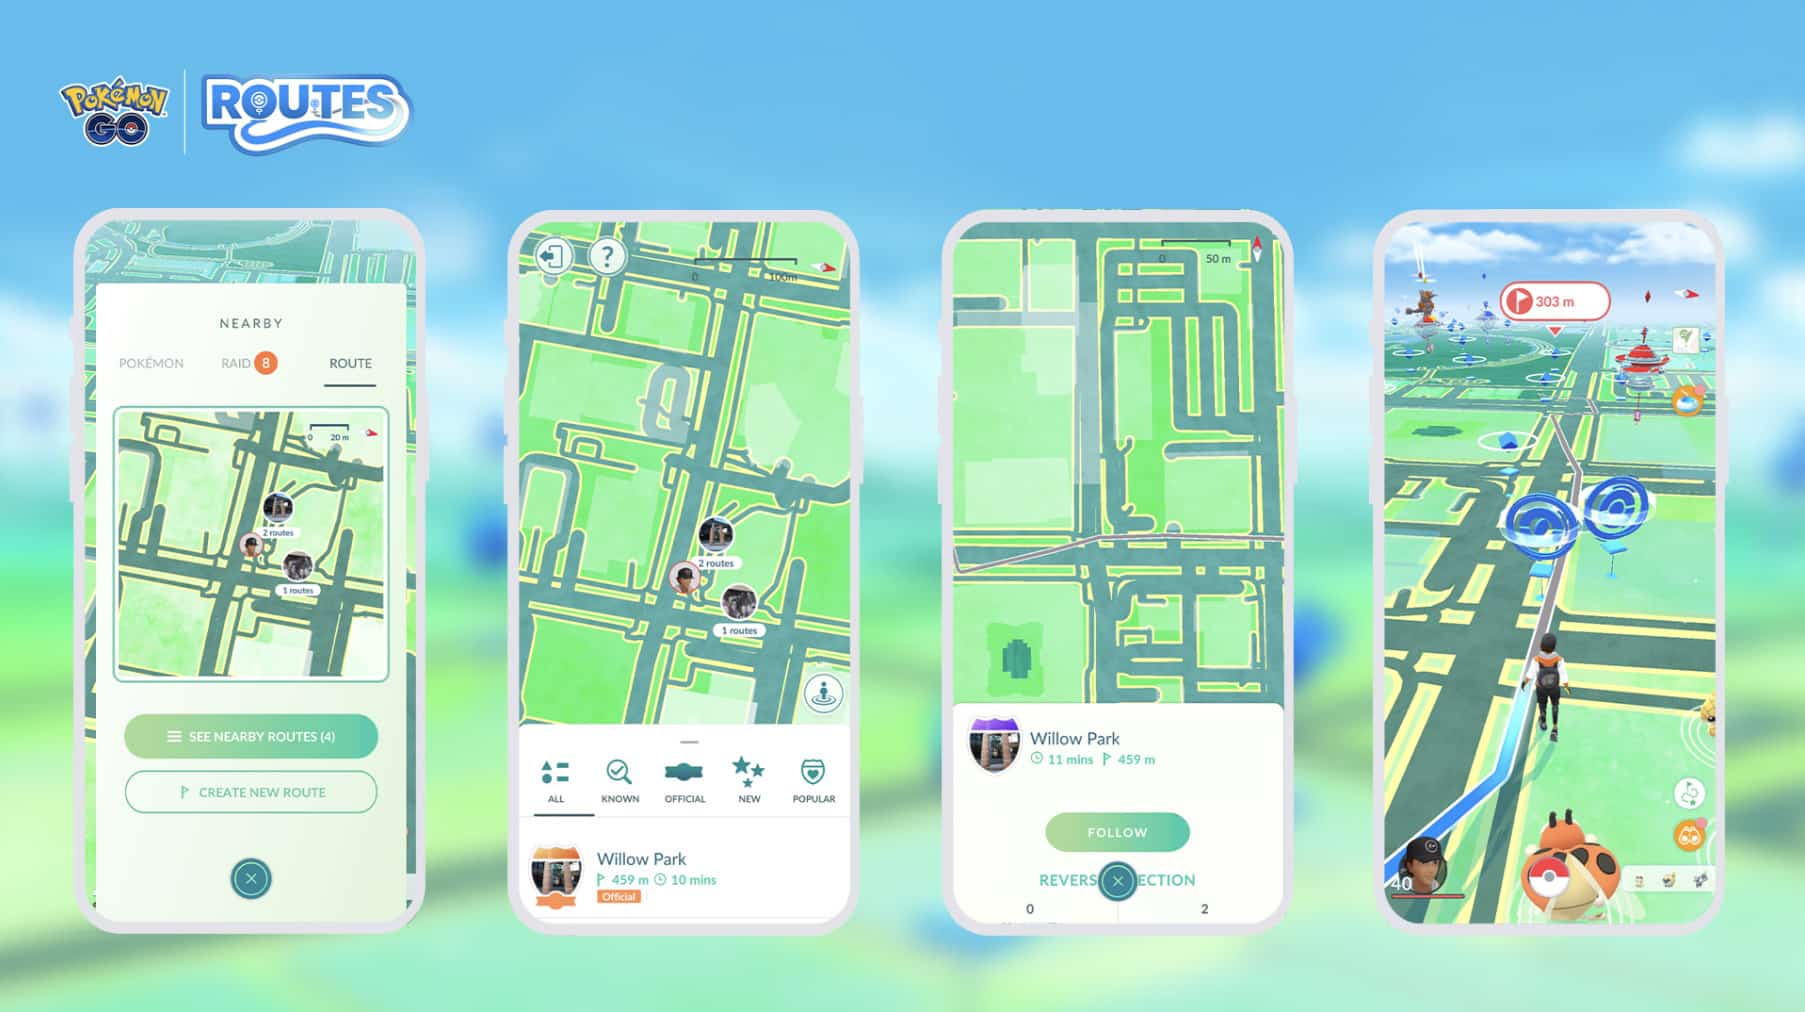
You can see a list of nearby Routes by tapping on the Binoculars menu and tapping on the Route tab. This will show you nearby locations that serve as Route start points. Tap the See Nearby Routes to expand the map and see a list of available Routes.
As you are browsing the Routes list, you can tap on the flag button in the bottom right corner to sort the list by other options. By default, the list will show Routes that are nearest to you.
Tap on a Route to preview it and review the details. You will be able to see how many other Trainers have followed that Route, how many times you have followed the Route, the distance and the approximate amount of time it might take to complete the Route.
Scroll down this page to see Trainer-provided details, including a description of the Route, any Route Tags that have been added to the Route, elevation changes and the original Route creator.
To return to the list of Routes, tap the exit button in the top left corner.
Note: Sometimes nearby routes might not show on the routes list. If you’re looking for a route and it isn’t showing up, you can try to refresh the list by going to Settings > Advanced > Refresh game data.
Walking a Route
- Check the Route tab from the Nearby menu to see local Routes.
- Choose one that catches your eye.
- Follow the Route and enjoy exploring!
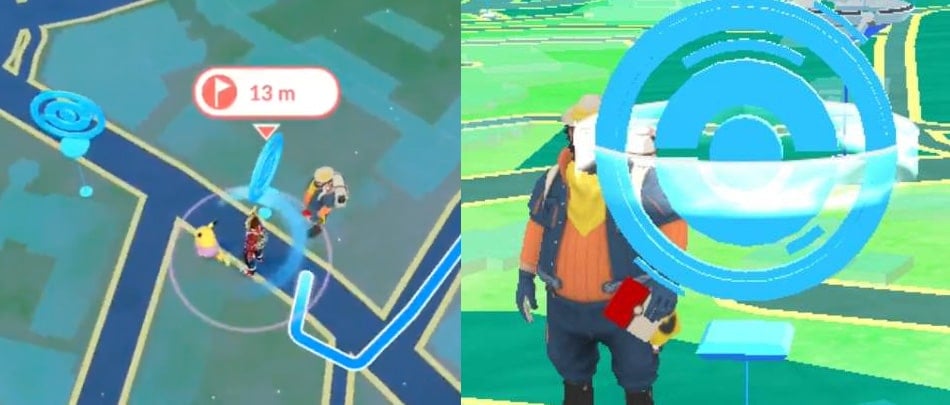
Once you have found a Route and you are ready to begin, tap the Follow button. Note that the Route will not begin until you have moved close enough to the Route start point. A message will appear on the Map View if you are too far away.
The Route start point will feature a blue flag above the Poké Stop on the Map View. The Route will start automatically once you are close enough to the start point. Note that if you are already close enough to the start point, the Route will begin right away.
Follow the path marked on the Map View to follow the Route. While you are following the Route, the path will change color to show your progress towards completing the Route. Some Routes are able to be followed one-way only, while others can be followed in reverse or are a loop. These options are determined by the Route creator during the creation process. Tap the Route icon above the Binoculars menu at any time to see your active Route’s details.
Pause the Route at any time by tapping the Pause Route button on this page. If you pause a Route, you will need to return to your paused location and tap this button again to resume the Route.
To quit the Route, you can scroll to the bottom of the Route details screen and tap the Quit Route button. You will exit the Route once you tap Quit Route again on the confirmation screen.
Once you have followed the Route path and have reached the end point, or the start point if the Route is a loop, you will earn the Route Badge! Similar to a Gym Badge, each Route has its own individual Badge that features an image from the start or end point. Complete the same Route multiple times to level up your Route Badge. You can see all of your Route Badges on your Trainer Profile under the Routes section.
After you have reached the end point, you will see a confirmation that you have completed the Route and details of any item rewards you have received for completing the Routes. The Route title, badge and rewards will be recorded in your Journal.
The last step in completing the Route is to give the Route a star rating. Your rating will be used to assess the quality of the Route, but will not be shared publicly. If you have previously given that specific Route a rating, you will not see this screen.
Note that it’s possible to reach the end point of the Route but not complete the Route. This may occur if you didn’t follow the exact path set by the creator. To complete the Route in this case, resume the Route and continue to follow until you have traveled the full Route distance.
Route Spawns
Routes also have dedicated Route Spawns that can appear on them, that are marked by their route logo, as shown on the far right of the image below. Regional Pokémon are very common route spawns, so if you are travelling and hoping to encounter a regional, a route is a great way to try! Other Pokémon can spawn, but regional Pokémon have proved to be the most common spawns so far.
![]()
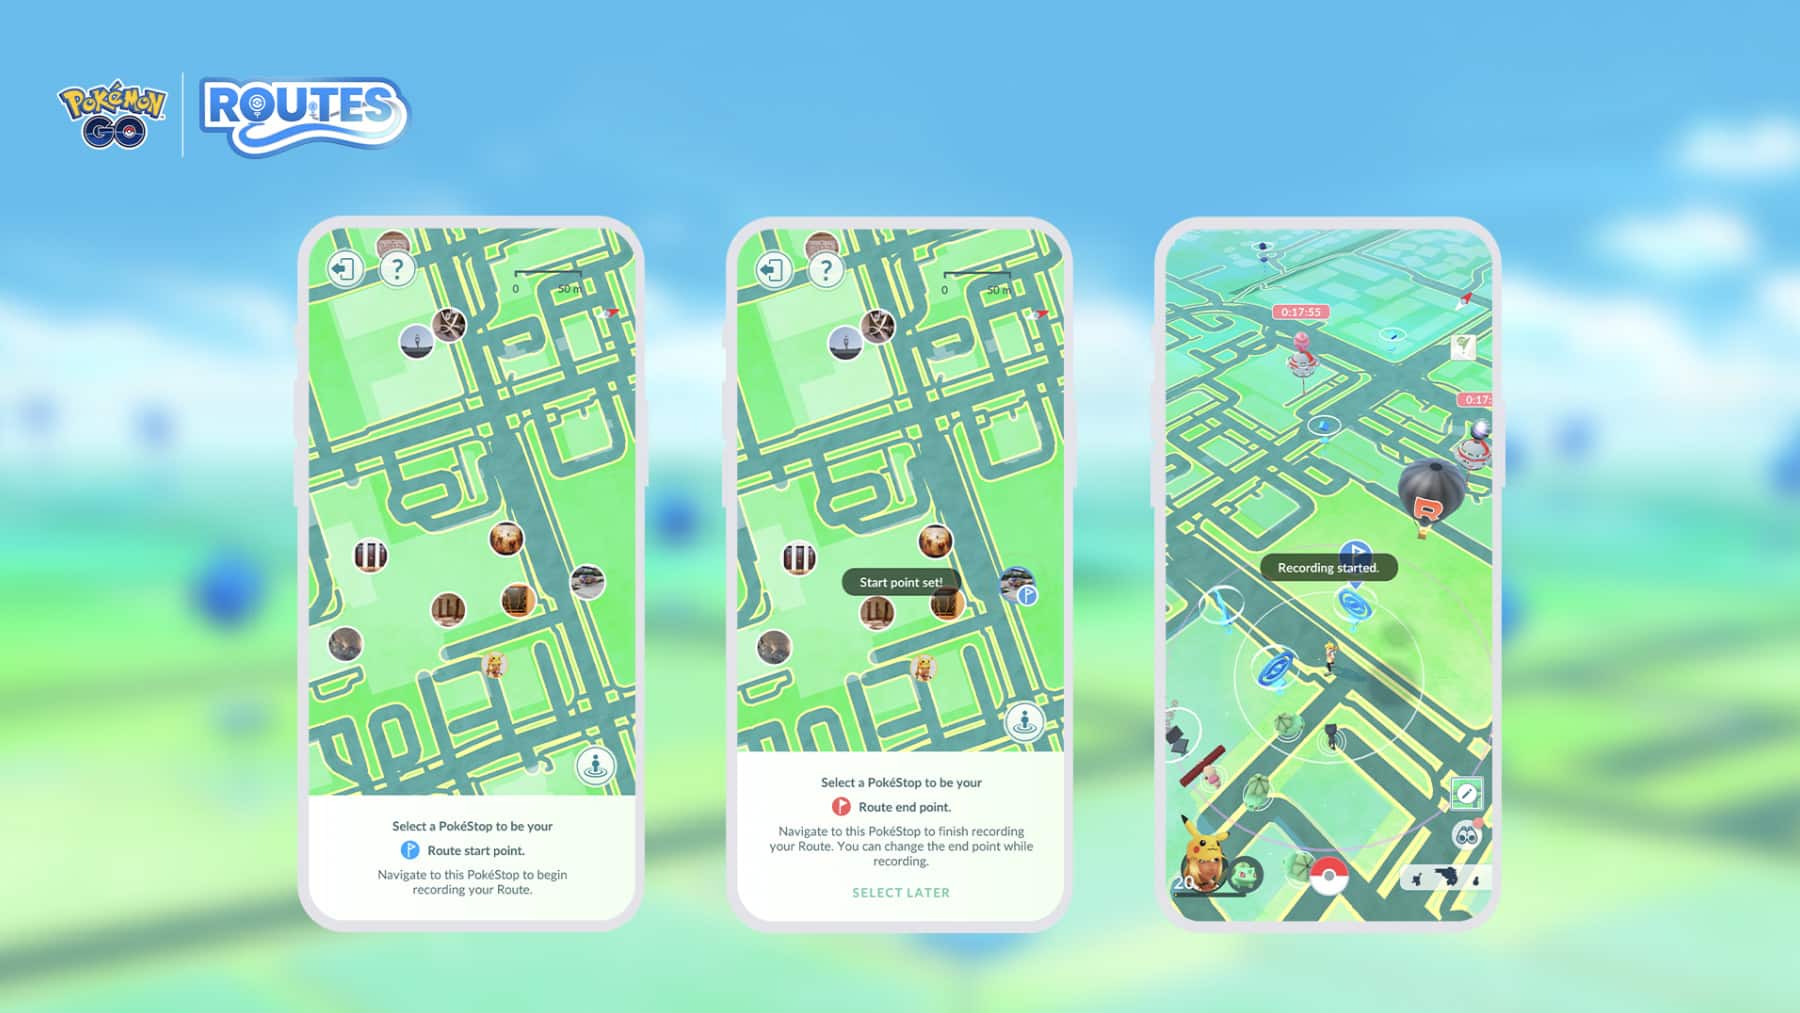
Recording a Route
- Choose a PokéStop or Gym to be your starting point.
- Hit record to begin mapping your Route by walking.
- Fill out some info about your Route when prompted, then submit it for review.
- The route will then go under review. Once accepted, Trainers can follow your Route!
- Routes need a minimum length of 0.5km and have a maximum of 20km
- You can submit up to 4 routes a week.
Note: If you have had a route stuck in ‘pending’ for a long time, try editing the title or description and resubmitting. This often prompts any routes that seem to have got stuck in the approval system during the launch of routes.
Reporting a Route
If you find a Route that is in violation of the Niantic Terms of Service or Player Guidelines, you can submit a report to the Niantic team directly from within Pokémon GO.
From the Route details screen, scroll to the bottom and tap on Report Route. You will be asked a series of questions to gather sufficient information to perform an investigation into the Route. Once you have submitted your Report, note that you may not hear back from Niantic regarding the status of your Report or any action that is taken in response.
You can also report a Route from the rating screen by giving a Route a 1-star rating and tapping the Report Route button.
Zygarde and Cells

- Keep an eye out while you’re exploring a Route—you might come across a Zygarde Cell! You can encounter Zygarde cells a maximum of three times per day.
- They will be identifiable as a glowing orb towards the end of your route. Be sure to click on them to collect them before you finish the route!
- Zygarde Cells are the components that make up Zygarde, the Order Pokémon. You can collect Zygarde Cells in your Zygarde Cube and use these cells to change Zygarde’s form.
- You need a total of 250 Zygarde Cells to change their form to obtain the 100% Zygarde!
- Encounter Zygarde in the Special Research story “From A to Zygarde”!
- Zygarde in PvP
- Zygarde Lore and Science
Mateo
Routes in Pokémon GO. He is a friendly researcher that loves picking up and exchanging Gifts with Trainers, and allows Trainers to participate in Gift Exchange and obtain a Gift from another Trainer.
You can meet Mateo by completing a Route. When you complete a Route, Mateo may be waiting for you at the end point. He’ll then ask if you’d like to participate in a Gift Exchange.
- As you near the end point of a Route, Mateo may be waiting for you with some Gifts he has collected!
- Talk to Mateo to begin a Gift Exchange.
- Choose which of Mateo’s Gifts to exchange from the Route end point, the Route start point, or a nearby PokéStop.
- Add a sticker if you like, and select Exchange.
- Get ready to receive your new memento from another Trainer! Don’t forget to add new Postcards to your Postcard Book to expand your Postcard collection and catch different forms of Vivillion.
You can participate in a Gift Exchange with Mateo once a day. Be sure to have your encounter with Mateo before you complete the route, or he will vanish.
Niantic Support have shared that you can only encounter Mateo on your first Route of the day.
Quick notes:
- Mateo doesn’t drop Zygarde cells.
- If you pause a Route, Mateo will disappear. He’ll appear immediately after you hit restart, but if you choose to complete the line you won’t see him again (during this session) in the same day.
- Clicking on the Complete Route button will skip interacting with him Mateo.